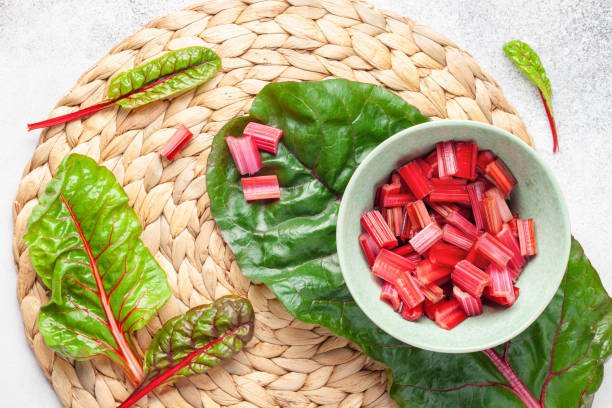
Fermented Chard.
READY IN 5 MINUTES PERIOD OF EARLY FERMENTATION: 24–72 hours YIELD: 1 pint; recipe may be increased in quantity
Simpler than this two-ingredient ferment is impossible! It’s a good overview of how fermentation works.
Chard is a leafy green that I regard as two distinct vegetables. It is also known as Swiss chard (outside of Switzerland, where they find it humorous that Americans call it that).
The green portion is delicious both fresh and cooked. The thick, juicy, crunchy leafstalks are another option. We shall create this ferment using the latter.
For this ferment, any variety may be used. The simple white kind of rainbow chard tastes just as excellent and creates a festive-looking ferment thanks to its red, gold, and white leafstalks.
Since beets and chard (Beta vulgaris) belong to the same species, you may substitute the leafstalks from those vegetables if you have any beet greens on hand.
Lacto-fermented chard ribs taste great on top of salads and may also be thrown into soups at the last minute. If you don’t mind some of the probiotic advantages being diminished by the heat of the oven, they are great cooked into casseroles with chickpeas and feta cheese.
INGREDIENTS
one huge bunch of chard leaves’ leaf stems
non-chlorinated or filtered water
INSTRUCTIONS
After washing the chard leaves, chop off the green portions and preserve them for later. The chard leaf stems should be cut into 1- or 2-inch segments.
Place the chard in an uncontaminated glass container. Placing the jar on a little plate. Over the chard pieces, pour the filtered or non-chlorinated water. Place a lid on top after completely filling the jar. The cover will keep the chard pieces immersed in the water, but you want to leave enough room for gases to escape as the chard ferments.
After 24 hours, let the chard jar sit at room temperature. After then, remove the cover and look for fermentation hints. Within 24 to 72 hours, the liquid should begin to bubble or foam, and the chard will begin to smell light-sour and typical of a recent fermentation.
When the chard is obviously fermenting, keep it at room temperature. Keep the jar filled with filtered or non-chlorinated water at all times for the 1 to 3 days that this will take.
After a few days of fermentation have passed, pour out only a 4. After the fermentation process has been going on for a few days, pour off a little amount of the liquid and securely shut the lid this time. Place the Lacto-fermented chard in a fridge or cold storage space.
The texture is best if consumed within three months, although it will keep, cold, for at least six months. Keep in mind that white chard leafstalks might sometimes become black throughout the fermentation process, particularly the portions in the upper half of the jar. They will still taste nice despite this mild condition.
Individual-Jar Sauerkraut
READY IN 5 MINUTES TIME FOR SALTING: 4 hours PERIOD OF EARLY FERMENTATION: 2 to 3 days
QUALITY: 1 QUART
Sauerkraut is “the gateway ferment,” as fermentation expert Sandor Ellix Katz has said, and with good reason. People who ordinarily avoid the combination of raw food and vigorous bacterial activity When informed,
“That’s how sauerkraut is created,” remain cool. They’ve probably had sauerkraut before, maybe with a hot dog. Just salt and cabbage are required for the dish, with extra flavors like caraway and juniper berries being typical.
You may want to try the homemade variety if you don’t believe you’ll like sauerkraut. It tastes significantly lighter than the vinegar-based, canned commercial versions, especially when it has just been produced.
Although sauerkraut may be stored in the refrigerator for at least six months, it is best consumed within three months since the texture of the cabbage begins to deteriorate after that. Because the top shelf of the main compartment of refrigerators is the coldest spot, food will last the longest there.
INGREDIENTS
1 tiny cabbage, red or white
14 teaspoon caraway seeds, 1–2 teaspoons kosher or sea salt (optional)
6 or more juniper berries (optional)
INSTRUCTIONS
Split the little cabbage in half, then slice away the stem and core, which are both tough. The leftover cabbage should be cut into thin ribbons or little bits.
Fill a clear glass jar with a wide opening with the cabbage. As you add the cabbage to the jar, season it with salt. As you proceed, continue to add the caraway seeds and juniper berries. To start letting the cabbage’s juices out, press down forcefully on it.
Put a cover on the fermenting kraut and let it out for up to 4 hours at room temperature. During this time, the salt should have drawn out enough juice from the cabbage to thoroughly submerge the vegetable pieces in liquid (you may need to push down on the kraut once more to do this).
Make a brine by combining 2 teaspoons of kosher or sea salt with 1 pint of filtered or non-chlorinated water if there isn’t enough cabbage juice to thoroughly cover the food.
Fill the container with brine until the cabbage is fully immersed.
In order to keep the food buried in the liquid while fermenting in bigger crocks and jars, a weight must be added. You just need to add the brine to the jar until it is completely full when using a simple single-jar recipe like this one. The jar should then be set on a small dish or tray, and its lid should be placed loosely on top. The components will stay beneath the brine since the container is filled to capacity.
Any spillage throughout the meal will be contained in the dish or tray.
Any spillage that occurs throughout the fermenting process will be caught in the plate or tray.
For approximately three days, leave the jar at room temperature. Remove the cover and check on your sauerkraut at least once per day. The liquid should still be drenching the cabbage.
If not, prepare a brine by combining a pint of filtered or non-chlorinated water with one to two tablespoons of kosher or sea salt. Add just enough brine to the kraut to cover it. To get the pieces of cabbage below the liquid, press down on the cabbage with the back of a spoon or your clean fingertips.
When fermentation has started, you may see bubbles frothing up on the liquid’s surface (particularly just after you push down on the cabbage). The kraut will begin to take on its distinctively sour-yet-clean flavor and aroma.
Keep in mind that temperature impacts how quickly fermentation occurs: If it’s really warm, the kraut could be ready for the next phase after just two days, however in a chilly climate, you might need to wait an additional day or two for fermentation to begin.
Move the sauerkraut jar to the refrigerator after fermentation has continued for at least a few days. At this time, it is not necessary to have a plate below it. Before consuming the sauerkraut, give it another week to develop its taste. As the kraut matures, the taste will become progressively sour (remember that refrigeration slows fermentation, but does not halt it).
Radish Kimchi
15 minutes for preparation PERIOD OF EARLY FERMENTATION: 2 to 3 days YIELD: 1 pint; recipe may be increased in quantity
The strong fermented condiment known as kimchi is a staple of Korean cooking. It is prepared in specialized kimchi pots in Korea, often with the fermenting process taking place underground. There is often warm weather, although beneath it is colder. Raw fish and hot chili peppers are just two of the many elements that go into making kimchi. Families all have their own unique recipes.
Sauerkraut and kimchi are both fermented in a very similar manner, and both are mostly comprised of cabbage. The radish is often a side ingredient added to the cabbage in most kimchi preparations, along with strong flavors like a lot of garlic.
For crunchier kimchi, I’ve flipped the traditional ratio of cabbage to radishes in this recipe. For a more colorful outcome, I also advise using red-skinned Cherry Belles or watermelon radishes in place of the conventional white daikon radish.
INGREDIENTS
- 3 cups of non-chlorinated or filtered water
- two tablespoons of medium-grain or kosher sea salt
- two tablespoons of medium-grain or kosher sea salt
- 1/4 pound of radishes, 1/2 teaspoon soy sauce, or nam pla (fish sauce)
- 14 pound of thinly sliced cabbage leaves
- cut and peeled 1 small onion
- 2 sliced and peeled garlic cloves
- One teaspoon freshly grated ginger root
- 1 to 2 chiles or teaspoons of red pepper flakes
INSTRUCTIONS
Stir the salt into the filtered or non-chlorinated water to dissolve it. Add the nam pla or soy sauce and stir.
Radishes must be washed. Cut off the root and stem ends, then compost them or throw them away.
Peel larger red radishes, like watermelon or daikon, but don’t peel little red radishes. The radishes may be sliced into 1/8-inch disks or julienned with the skin still on. The radishes may be sliced into matchstick-sized disks or julienned into 1/8-inch strips. The slicing will proceed more quickly using a mandoline.
In a large bowl, mix the radishes, cabbage, onion, garlic, ginger, and chile peppers or red pepper flakes. Fill a clean glass pint jar halfway with the veggies and spices, allowing about 14 inch of headspace.
Add the brine to the contents of the jar. To expel any air bubbles from the meal, push down on it with clean fingertips or the back of a spoon. The veggies and spices must be fully submerged in the brine.
A smaller glass jar filled with water may be placed right on top of the food to weight it down if the food begins to float up out of the brine. Alternatively, you may just fill the jar completely, leaving no headspace whatsoever, and then loosely cover it with a lid. The lid will keep the food submerged in brine (keep in mind that because you are not canning this recipe, head space in the jar is not required for a vacuum seal).
However, don’t tighten the lid; you need room for the gases that form during fermentation to escape. Because it will likely overflow a little after fermentation begins, place the jar on a small dish.
Keep the kimchi out for two to three days at room temperature. Take off the lid or smaller bottle weight each day and check for bubbles on the surface, which are an indication of fermentation. If you lightly push down on the food, you’ll be able to see them plainly.
But don’t just look for indications of fermentation; come near and sniff to detect the fresh-but-tangy pickled aroma that indicates the safe, delectable, and healthful change you’re wanting is taking place.
Due to the nature of kimchi, the sour fragrance will also be accompanied by the aroma of garlic and other flavors.
Store the kimchi in the refrigerator or a cool, dark basement after it has been fermenting for at least a day. The cool storage temperature will significantly slow down fermentation, so you won’t need the plate below the jar anymore. This should prevent any overflow. However, if you used a bottle weight, you must take it out and swap it out for the jar lid.
NOTE
One to two weeks after you start it, your kimchi will be ready to consume, and it will keep for at least a year (bearing in mind that the spice in it will grow spicier with time!).
VARIATIONS
Slivers of carrot or beetroot may be used in lieu of the recipe’s radishes, the cabbage can be completely omitted, or turnips can be used to make sauerruben in place of the radishes.
Green Beans Fermented in Milk
READY IN 10 MINUTES PERIOD OF EARLY FERMENTATION: 1-3 days QUALITY: 1 QUART
One of the most often fermented vegetables is green beans. Perhaps this is because to the mild taste they continue to have even after being stored for months in a crock or jar. They may be served like a pickle, but you can also use them as a vegetable side dish since their taste is still so mild.
INGREDIENTS
- Green beans, 2 pounds
- 3 cups of non-chlorinated or filtered water
- 1 tablespoon of medium-grain or kosher sea salt
INSTRUCTIONS
Clean the green beans first. Cut or snap the ends off.
Stir the salt into the filtered or non-chlorinated water to dissolve it.
Start adding the green beans to a clean, quart-size glass jar by tipping it on its side.
If you start by placing the beans in the jar horizontally, as opposed to attempting to get them to remain in place with the jar vertical, you will be able to get more beans in and they will stand straighter.
Set the jar upright after it is sufficiently filled so that the green beans are holding one another in place. Green beans should be stuffed until there is no room for even one more.
Although the beans may somewhat contract during fermentation, packing them extremely firmly prevents them from rising to the surface of the brine.
Cover the green beans with the brine of salt and water. A thorough covering should be provided. Loosely cover the jar with a lid to allow the gases that form during fermentation to escape.
Position a little plate underneath the jar to collect any spills that may happen during fermentation. For two to three days, let the jar of green beans and brine outside at room temperature. Remove the cover at least once every day, and check for bubbles on the surface or other indications of fermentation.
If you lightly push on the meal, you’ll particularly notice them. Not only that, but come near enough to smell for the clean, tangy pickled aroma that indicates the safe, delectable, and healthful change you’re wanting is taking place.
Green beans that have been fermented will have a mild sauerkraut-like aroma.
Move the green beans to the refrigerator or a cold, dark cellar after they have been actively fermenting for at least 24 hours. The cool storage temperature will significantly slow down fermentation, so you won’t need the plate below the jar anymore.
This should prevent any overflow. Keep in mind that a refrigerator’s door has a warmer temperature than the inside of the container you’re using to store the green beans.
If you want to consume the fermented green beans within a few weeks and want a more active fermentation to continue, keep the jar on one of the refrigerator door shelves.
If not, keep them within the main compartment, ideally on the top shelf.
VARIATIONS
Green beans taste just like fermented yellow wax beans. The simple reason I prefer to combine the two in a jar is that they look nice together.
• For a hotter ferment, add a crushed garlic clove and/or one or two tiny, spicy chile peppers.
• Add a sprig or two of fresh dill for a delicious taste variety.
How Lacto-Fermentation Safely Preserves Food
Generally Useful Gear For Canning And Preservation.