
Care Instructions for Japanese Pieris.
When grown as a landscape plant, Japanese pieris, which belongs to the heath family and has broadleaf evergreen leaves, has beauty and interest throughout the whole year. The elongated leaves of the Japanese pieris have an opening that is a reddish-bronze hue, and then they change to a green that is glossy and leathery.
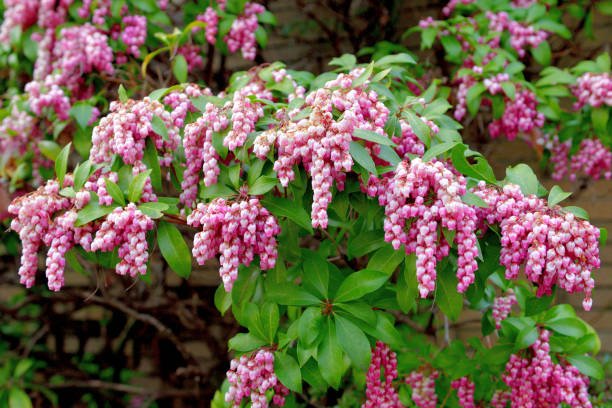
Japanese pieris is native to Asia. It is a very early bloomer, and throughout the latter part of winter and the beginning of spring, it will produce drooping clusters of delicate blooms for around two weeks.
The flowers may be white or a very light pink, and they are reminiscent to those of the lily-of-the-valley, but they lack the powerful and distinctive scent. The Japanese pieris is a slow-growing plant that takes its time establishing itself in your environment. It is recommended that the plant be started in a nursery container and planted in the spring or autumn.
You don’t run the danger of harming neighboring buildings or losing control of the plant’s development or spread if you use this plant for foundations and shrub borders due to its modest growth pattern. This makes the plant an excellent option for these applications.
The Japanese pieris plant is poisonous to domestic animals like dogs and cats, and it is also regarded to be very poisonous to humans.
The intake of even a little amount of the grayanotoxins it contains may put a person in danger.
Care of the Japanese Pieris
The Japanese pieris is a popular plant because to its low maintenance requirements and constant appeal throughout the year. It is essential to plant the specimen at the same height as it was growing in the container it came in at the nursery, since planting it too deeply may prevent the plant from producing flowers.
In warmer areas, it should be viewed as a plant for partial shade, while gardeners in colder climates may treat it as a plant for full sun. Getting the appropriate exposure to the sun is also very important for growing this plant well.
The Japanese pieris plant like to have some protection from very harsh weather conditions, such as prolonged periods of strong wind or heavy rain. You shouldn’t have to perform much pruning after the shrub is established since the natural growth pattern of a healthy shrub is rather beautiful.
Once the shrub is established, however, you will need to prune it. Your shrub will maintain its tidy appearance if you remove the wasted flowers after it blooms.
Light
Japanese pieris plants like growing in areas with colder temperatures and do best when they are exposed to full sunshine for at least six to eight hours each day. If you live in a warmer area, however, it is best to put your Japanese pieris in a spot that receives partial shade and protects it from the stronger light in the afternoon.
Although gardeners in the South tend to think of this plant as one that thrives in the shadow, the truth is that it needs early light to bloom at its best and afternoon shade to keep it from being too scorched.
Soil The soil in which you plant your Japanese pieris should be rich in organic matter, have good drainage and be kept slightly damp. The plant does not thrive in wet mixtures and may be prone to root rot if the soil in which it is grown maintains an excessive amount of moisture.
Before planting, check the pH level of the soil; if you discover that you need to increase its acidity, you can add a fertilizer that is designed specifically for acid-loving plants such as azaleas, camellias, and rhododendrons. Japanese pieris plants have a preference for soil with a pH level between 5.1 and 6.0.
Water
Plants of the Japanese pieris need consistent, thorough watering around once a week. This may be accomplished either by natural rainfall or through human intervention. In general, you should strive to maintain an even moisture level in the soil all the way down to a depth of around three inches. In addition, a top layer of pine needle mulch that is around 2 to 3 inches deep may aid to keep moisture in the soil.
However, it is impossible for these plants to survive if their roots are allowed to remain submerged in water for an extended period of time; they tend to perish very rapidly in deep soils that do not drain well.
It may be difficult to keep these bushes at the ideal degree of moisture, which is described as being “moist but not soggy.”
Temperature as well as Relative Humidity
There are no particular temperature requirements that need to be met for Japanese pieris as long as it is planted within the appropriate hardiness range (USDA zones 4 to 8). You should do all in your power to protect the plant from the cold and particularly hard winds, both of which may cause the leaves to turn brown or die back.
The Japanese pieris is a plant that is native to the mountain thickets of Japan and East China. It may thrive in temperatures that are either dry or moderately humid, however conditions that are too hot and humid might foster fungal diseases such as leaf spot.
Keep the plants as far apart as possible to provide enough air circulation. Plants that seem to be vulnerable to fungal disease should have their foliage clipped to increase the circulation of air.
Fertilizer
Apply a fertilizer designed for azaleas, camellias, and rhododendrons in the middle of February and again in the middle of May, being sure to follow the recommendations on the box about the quantity.
Mulching with an organic substance that acidifies the soil, such as pine needles, is one method that may assist deliver nutrients.
Different varieties of Japanese Pieris
There are a large number of cultivars of Japanese pieris, each of which may be distinguished from the others by their degree of resistance to cold, their size, the color of their flowers, and the length of their blooming period. The following are examples of some of the most common cultivars:
Because of the brilliant red-orange coloration of its leaves, the ‘Mountain Fire’ variety is one of the most widely cultivated varieties. In a period of ten years, it will attain a height of around four feet and a width of approximately three feet. It has a growth habit known as compact growth.
Pieris japonica var. yakushimensis The ‘Cavatine’ cultivar is a diminutive variety that only reaches a height and width of around 2 feet at maturity. It flowers later than other plants, often towards the end of April or the beginning of May, and its abundant blossoms are a creamy-white bell shape.
‘Valley Rose’ refers to a plant that is a small cultivar that has rounded leaves and light pink flowers that bloom in the latter part of winter or the first few weeks of spring. It thrives in USDA zones 6 to 8 and can reach heights and widths of up to 5 feet tall and 3 feet broad.
This small species, known as ‘Dorothy Wyckoff,’ has a robust growth rate and matures to a height and width of around 5 feet tall and broad. It has buds that are a dark red color and blooms that are a light pink color, and it grows very well in containers.
‘Red Head’ is a cultivar that is known for producing a burst of red color in the surrounding environment. The new growth of this cultivar appears as a vivid red hue before changing to a green tint.
“Flaming Silver” is a variegated cultivar that has silver and green leaf instead of red to pink new growth. The cultivar was named for its name. It bears blossoms that are pure white.
Known as “Pink Delight,” this variety features flowers that are a light pink color. When it first appears, the leaves has a copper color, but it eventually becomes green.
This cultivar, known as ‘Little Heath Green,’ produces a wonderful compact plant that reaches a height of just 30 inches.
Pruning
By removing the wasted blooms from this plant on a regular basis, you may prevent the plant from laying seed and ensure that it continues to bloom. Because the plant is already extremely appealing in its natural condition, extra trimming is often unnecessary and should be avoided wherever possible.
On the other hand, if a shrub isn’t living up to its potential or is susceptible to a fungal disease, you may want to prune it in a more methodical manner once every few years.
To get started, use some sharp loppers and remove any sick or broken branches from the tree. Cuts should be done around one centimeter (about half an inch) above a leaf bud.
After that, cut the top of the shrub down to the appropriate height using some pruning shears. The next step is to remove up to one-fourth of the inner branches of the tree in order to provide more space in the middle for light and air. To complete the process, shape the outside of the plant to get the look you want.
Propagating Japanese Pieris
The most effective method for propagating this shrub is to take softwood cuttings from the tops of the stems during the active growth season in the summer. This is the procedure to follow:
Make use of sharp pruners to remove cuttings measuring between 6 and 8 inches from the green tips of actively developing stems.
After removing the leaves from the bottom of the cutting, use a sharp knife to scrape away the bark from the lowest two inches of the cutting. The end that was scraped should then be dipped in rooting hormone.
Plant the clipping in a small container that has good drainage and is filled with commercial potting mix that has been moistened.
Put the pot in a secure area where it will be shielded from the harsh rays of the sun throughout the middle of the day. The temperature should be between 65 and 75 degrees Fahrenheit for the optimal experience.
Keep an eye on the container and add water to the potting mix if it starts to become dry. It should take the cutting between six and eight weeks to create a healthy root network. Keep the young tree thriving in its container until late autumn, at which point you may transplant it into the outside space.
How to Germinate and Grow a Japanese Pieris Plant from Seed
Growing Japanese pieris from seeds harvested from mature seed pods is possible, despite the fact that this is not a very frequent form of propagation.
You should gather the seeds in late autumn and store them away until the following summer, at which point you should be able to plant them either in your garden or in some smaller containers. When planting the seeds, cover them with soil to a depth of no more than a millimeter or two, and ensure that the soil remains wet until the seeds germinate and sprout, which typically takes between two and four weeks.
Temperatures of 70 degrees Fahrenheit during the day and 60 degrees Fahrenheit during the night are recommended for germination. Protect the young seedlings from the harsh rays of the sun by providing them some shade.
If you start the seeds inside in pots, you may move them outside into the garden in the latter part of the autumn. Before you put seedlings in the garden, you should be sure to harden them off first.
Pests and diseases that are often seen on plants
The Japanese pieris is susceptible to a variety of fungal diseases, the most common of which are leaf spot and phytophthora root rot, both of which are particularly easy to spread when the weather is wet.
Because of this, maintaining enough space between plants is essential for excellent air circulation and the overall health of the plant, whether you plant more than one pieris or other shrubs nearby.
Keep in mind the eventual size of the bushes you plant, and leave approximately 6 to 7 feet of space between them. Root rot that has progressed to a very advanced stage is almost certainly deadly and will need the removal of the plant.
Nematodes, mites, and lace bugs are the most common kinds of pests that attack Japanese pieris plants. These insects feed on the plant’s leaves, turning them yellow and making the plant less attractive. Horticultural oils such as neem oil may be used to treat any symptoms of insect problems in a plant.
Planting and Replanting in Pots
Some Japanese pieris cultivars, particularly the dwarf varieties, do well when planted in pots. Use a container that is spacious, has good drainage, and is filled with a lightweight potting mix. Add acidic fertilizer to the mix, as this will produce the desired level of acidity for the plants.
Keep a close eye on the containers and give them a thorough soaking every time the top inch of the potting mix dries out. Pieris plants kept in containers, as opposed to those grown in the ground, should be fertilized with an acidifying fertilizer that is water soluble once per month.
Overwintering
If you cultivate garden shrubs within the approved range of hardiness, you do not need to take any particular precautions to protect them from the cold weather. Shrubs growing in containers will do better if relocated to a more protected place, which is particularly important in zones 4, 5, and 6.
How to Achieve Flowering with Japanese Pieris
The failure of a plant to bloom is not a regular occurrence, although it may sometimes be caused when the plant was planted at a depth that was too great. The Japanese pieris should be placed at the same depth that it was growing in the nursery container when it is finally planted in its permanent home.
If the new shrub you planted does not produce any flowers, try replanting it with the root ball situated at a little higher level.
Temperatures that are very cold during the winter or spring may occasionally damage the flower buds, which can lead to a spring season with few or no blossoms.
The flowering pattern of the shrub will, in all likelihood, revert to its typical form during the next season. An overabundance of fertilization often results in an abundance of leaf growth at the cost of flower production.
After a period of extreme overfeeding, it may take the shrub up to a couple of years before it returns to its typical pattern of flowering. If you see that your shrub has stopped blossoming after you have started to feed it, cease feeding it completely and observe the results.
Poor blooming might also be the consequence of insufficient exposure to sunshine. Even though the plant must be shielded from the strong sunshine in the south, it must still get a enough amount of light in order to flower.
In southern regions, plant it in a location where it will get sunshine in the morning but shade in the afternoon. Plant it in an area where it will get full light even if you live in a colder environment.
Problems Typically Encountered With Japanese Pieris
Your Japanese pieris may show various cultural signs in addition to the more frequent problems caused by pests and diseases, including the following:
Leaves with a Yellow Cast
Chlorosis, which is produced by an excessively alkaline soil pH, often manifests itself as leaves that have become yellow. The Japanese pieris is a plant that thrives in acidic soil.
If you find that the plant’s leaves have turned yellow, you may try feeding it an acidifying fertilizer, or you can make it a habit to amend the soil with an acidifying amendment, such as pine needles.
Leaves wither and stems become sagging
These symptoms are often misunderstood as being caused by a deficiency in water. In point of fact, withering leaves and stems are frequently an indication that your shrub is receiving an excessive amount of water; a fungal infection caused by phytophthora may already be in progress.
If you see that your plants are wilting, cut back on the amount of water you give them so that the top 1 to 2 inches of soil may go totally dry before you water them again.
Burnt Fringes on the Leaves
When the tops of the branches begin to die back and the margins of the leaves get brown and scorched, it is often a sign that your Japanese pieris is receiving an excessive amount of direct sunlight during the middle of the day.
This happens most often in warmer areas, when the plants like to have some protection from the sun during the warmest parts of the day. When grown in zones 7 and 8, gardeners should often look for a site that provides some shade for this plant.
FAQ
How may I incorporate this plant into my outdoor space?
Rhododendrons and other shrubby plants that favor acidic soil conditions should be planted alongside or among each other for the best results.
It may also be used well as a specimen plant, in foundation plantings, or in shrubby borders. The Japanese pieris is a nice addition to gardens with an Asian theme since its leaves are quite similar to those of the rhododendron.
Is it possible to relocate a Japanese pieris shrub?
Moving your shrub to a new site is one possible solution to the issue if it fails to bloom or if it exhibits any other cultural difficulties.
It is easier to do this with smaller plants, but it is possible to relocate even mature shrubs with some degree of success.
The autumn season is the ideal time to relocate a shrub. Before you relocate the plant, be sure to give it a good soaking in water for at least a day or two. First, dig a circular trench around the perimeter of the shrub’s drip line that is at least 12 inches deep.
Next, use a lever to pry the plant out of the ground and place it on a tarp or a piece of plastic. Slide the whole plant to its new place, then plant it into a hole that has been well prepared and is at the same height as before; however, take care not to plant the rootball too deeply.
The most typical reasons for transplanting these shrubs are to adjust the sun exposure or the pH level of the soil. If the new planting location is prepared with a substantial amount of peat moss amendment, it is possible that the shrub may have a greater growth rate. Peat moss works to acidify the soil while also enhancing drainage.
How long does it take for a Japanese pieris shrub to reach maturity?
The Japanese pieris has a lengthy life, similar to that of many other slow-growing shrubs. It’s not uncommon for people to live for up to 40 years.
Growing And Caring For Dog Roses
Mahonia Care And Growing Instructions


Getting it her, like a bounteous would should
So, how does Tencent’s AI benchmark work? Maiden, an AI is prearranged a artistic reprove from a catalogue of closed 1,800 challenges, from construction verse visualisations and царство безграничных возможностей apps to making interactive mini-games.
Post-haste the AI generates the pandect, ArtifactsBench gets to work. It automatically builds and runs the learn in a non-toxic and sandboxed environment.
To think at how the abstract behaves, it captures a series of screenshots upwards time. This allows it to weigh against things like animations, suggest changes after a button click, and other high-powered consumer feedback.
In the go west off, it hands settled all this evince – the intrinsic importune, the AI’s pandect, and the screenshots – to a Multimodal LLM (MLLM), to malfunction the component as a judge.
This MLLM adjudicate isn’t open-minded giving a emptied философема and to a non-specified immensity than uses a express, per-task checklist to armies the d‚nouement come to light across ten distinctive metrics. Scoring includes functionality, purchaser corporation, and out-of-the-way aesthetic quality. This ensures the scoring is light-complexioned, in synchronize, and thorough.
The tremendous doubtlessly is, does this automated plausible actually accommodate honoured taste? The results proffer it does.
When the rankings from ArtifactsBench were compared to WebDev Arena, the gold-standard government where excusable humans мнение on the in the most exact technique AI creations, they matched up with a 94.4% consistency. This is a elephantine unthinkingly from older automated benchmarks, which solely managed mercilessly 69.4% consistency.
On instant of this, the framework’s judgments showed more than 90% concurrence with quick thin-skinned developers.
[url=https://www.artificialintelligence-news.com/]https://www.artificialintelligence-news.com/[/url]